


To provide support for the hierarchical Azure IoT Edge scenarios we started working on a connected registry implementation that will allow extension of the Azure container registry functionality to on-premises. For those of you who are not familiar with what a hierarchical IoT Edge scenario is, take a look at the Purdue network model used in the ISA 95 and ISA 99 standards – TL;DR: it is the network architecture that allows segregation of OT and IT traffic in manufacturing networks. While the Azure IoT team has provided a sample of the hierarchical IoT Edge environment, I wanted to reproduce it using physical ARM-based devices.
The problem with configuring a hierarchy of IoT Edge devices at home is that home networking devices do not allow advanced network configurations that you would normally expect from an enterprise-grade switch or router. While my Eero is good at its mesh WiFi capabilities, it is a very poor implementation of a switch and doesn’t allow the creation of multiple virtual networks or WiFI SSIDs. The routing capabilities are also quite limited, which to be honest, impact the ability to create secure IoT networks at home. However, I derail… To implement my configuration, I gathered a bunch of Raspberry Pi 4s, Pi Zeros, and an Nvidia Jetson Nano and got to work.
Here is the big picture of what are we implementing:

In this post, I will walk over the configuration of the IT Proxy in the IT DMZ layer shown in the picture above. For that, I decided to use a Raspberry Pi 4 device and configure it with the Squid proxy similar to the Azure IoT sample linked above. Before that though, let’s look at the device configuration.
Configuring the Raspberry Pi Network Interfaces
Raspberry Pi 4 has two network interfaces – WiFi one and Ethernet one. The idea here is to configure the WiFi interface to connect to my home network using the home network IP range 192.168.0.0/24 and wire the Ethernet interface to a simple switch and assign it a static IP address from the 10.16.8.0/24 network. Routing between the two interfaces should also be established so traffic from the 10.16.8.0/24 network can flow to the 192.168.0.0/24 network. Pulling some details from the Setting up a Raspberry Pi as a routed wireless access point article on the Raspberry Pi’s official website, I ended up with the following configuration.
Warning: Be careful here and don’t copy the commands directly from the Pi’s article! We are routing in the reverse direction – from the Ethernet interface to the WiFi interface.
- Install the
netfilter-persistentand theiptables-persistentplugin to be able to persist the routing rules between reboots:sudo DEBIAN_FRONTEND=noninteractive apt install -y netfilter-persistent iptables-persistent
- Configure a static IP address for the Ethernet interface. To follow the Azure IoT sample, I choose
10.16.8.4. Edit the DHCP configuration file withsudo vi /etc/dhcpcd.confand add the following at the end:interface eth0 static ip_address=10.16.8.4/24
- Enable routing by creating a new file with
sudo vi /etc/sysctl.d/routed-proxy.confand add the following in it:# Enable IPv4 routing net.ipv4.ip_forward=1
- Next, create a firewall rule with:
sudo iptables -t nat -A POSTROUTING -o wlan0 -j MASQUERADE
- Last, save the configuration and reboot the device:
sudo netfilter-persistent save
sudo systemctl reboot
Checking the configuration with ifconfig after reboot should give you something similar to:
pi@raspberrypi:~ $ ifconfig
eth0: flags=4163<UP,BROADCAST,RUNNING,MULTICAST>  mtu 1500
        inet 10.16.8.4  netmask 255.255.255.0  broadcast 10.16.8.255
        inet6 fe80::6816:2aa8:ab8d:9f93  prefixlen 64  scopeid 0x20<link>
        ether dc:a6:32:77:fb:99  txqueuelen 1000  (Ethernet)
        RX packets 5565  bytes 1359978 (1.2 MiB)
        RX errors 0  dropped 0  overruns 0  frame 0
        TX packets 131  bytes 14399 (14.0 KiB)
        TX errors 0  dropped 0 overruns 0  carrier 0  collisions 0

lo: flags=73<UP,LOOPBACK,RUNNING>  mtu 65536
        inet 127.0.0.1  netmask 255.0.0.0
        inet6 ::1  prefixlen 128  scopeid 0x10<host>
        loop  txqueuelen 1000  (Local Loopback)
        RX packets 22  bytes 1848 (1.8 KiB)
        RX errors 0  dropped 0  overruns 0  frame 0
        TX packets 22  bytes 1848 (1.8 KiB)
        TX errors 0  dropped 0 overruns 0  carrier 0  collisions 0

wlan0: flags=4163<UP,BROADCAST,RUNNING,MULTICAST>  mtu 1500
        inet 192.168.0.101  netmask 255.255.0.0  broadcast 192.168.255.255
        inet6 fe80::6788:d8e2:4e8a:558  prefixlen 64  scopeid 0x20<link>
        ether dc:a6:32:77:fb:9a  txqueuelen 1000  (Ethernet)
        RX packets 7619  bytes 1671937 (1.5 MiB)
        RX errors 0  dropped 0  overruns 0  frame 0
        TX packets 1494  bytes 346279 (338.1 KiB)
        TX errors 0  dropped 0 overruns 0  carrier 0  collisions 0
To test the connectivity through the newly configured router, I had to set up my Mac with a wired connection using a USB Ethernet adapter. Here the configuration:

traceroute yields satisfactory results showing that the traffic goes through the Raspberry Pi:
toddysm@MacBook-Pro ~ % traceroute 192.168.0.101
traceroute to 192.168.0.101 (192.168.0.101), 64 hops max, 52 byte packets
 1  192.168.0.101 (192.168.0.101)  9.146 ms  7.669 ms  10.125 ms
toddysm@MacBook-Pro ~ % traceroute 172.217.3.164
traceroute to 172.217.3.164 (172.217.3.164), 64 hops max, 52 byte packets
 1  10.16.8.4 (10.16.8.4)  2.555 ms  0.661 ms  0.377 ms
 2  * *^C
toddysm@MacBook-Pro ~ %
Installing and Configuring Squid Proxy
Installing Squid proxy is as trivial as typing the following command:
sudo apt install squid
However, there are two configuration settings you need to do to make sure that the proxy can be used from machines on the local network. Those settings are available in the Squid configuration file /etc/squid/squid.conf:
- First, the port configuration for the proxy is set to bind to any IP address but when the proxy starts, it binds to the IPv6 addresses instead of the IPv4 ones. You need to change the following line:
http_port 3128
and add the IP address of the Ethernet port like this:
http_port 10.16.8.4:3128
- Second, access to the proxy is enabled only from the
localhost. Uncomment the following line to enable access from thelocalnet:http_access allow localnet
Also, make sure that the
localnetis defined as:acl localnet src 0.0.0.1-0.255.255.255 # RFC 1122 "this" network (LAN) acl localnet src 10.0.0.0/8 # RFC 1918 local private network (LAN) acl localnet src 100.64.0.0/10 # RFC 6598 shared address space (CGN) acl localnet src 169.254.0.0/16 # RFC 3927 link-local (directly plugged) machines acl localnet src 172.16.0.0/12 # RFC 1918 local private network (LAN) acl localnet src 192.168.0.0/16 # RFC 1918 local private network (LAN) acl localnet src fc00::/7 # RFC 4193 local private network range acl localnet src fe80::/10 # RFC 4291 link-local (directly plugged) machines
The latter should already be done later in the file.
To make sure that the proxy is properly configured, I changed the networking configuration in my Firefox browser on my Mac as follows:
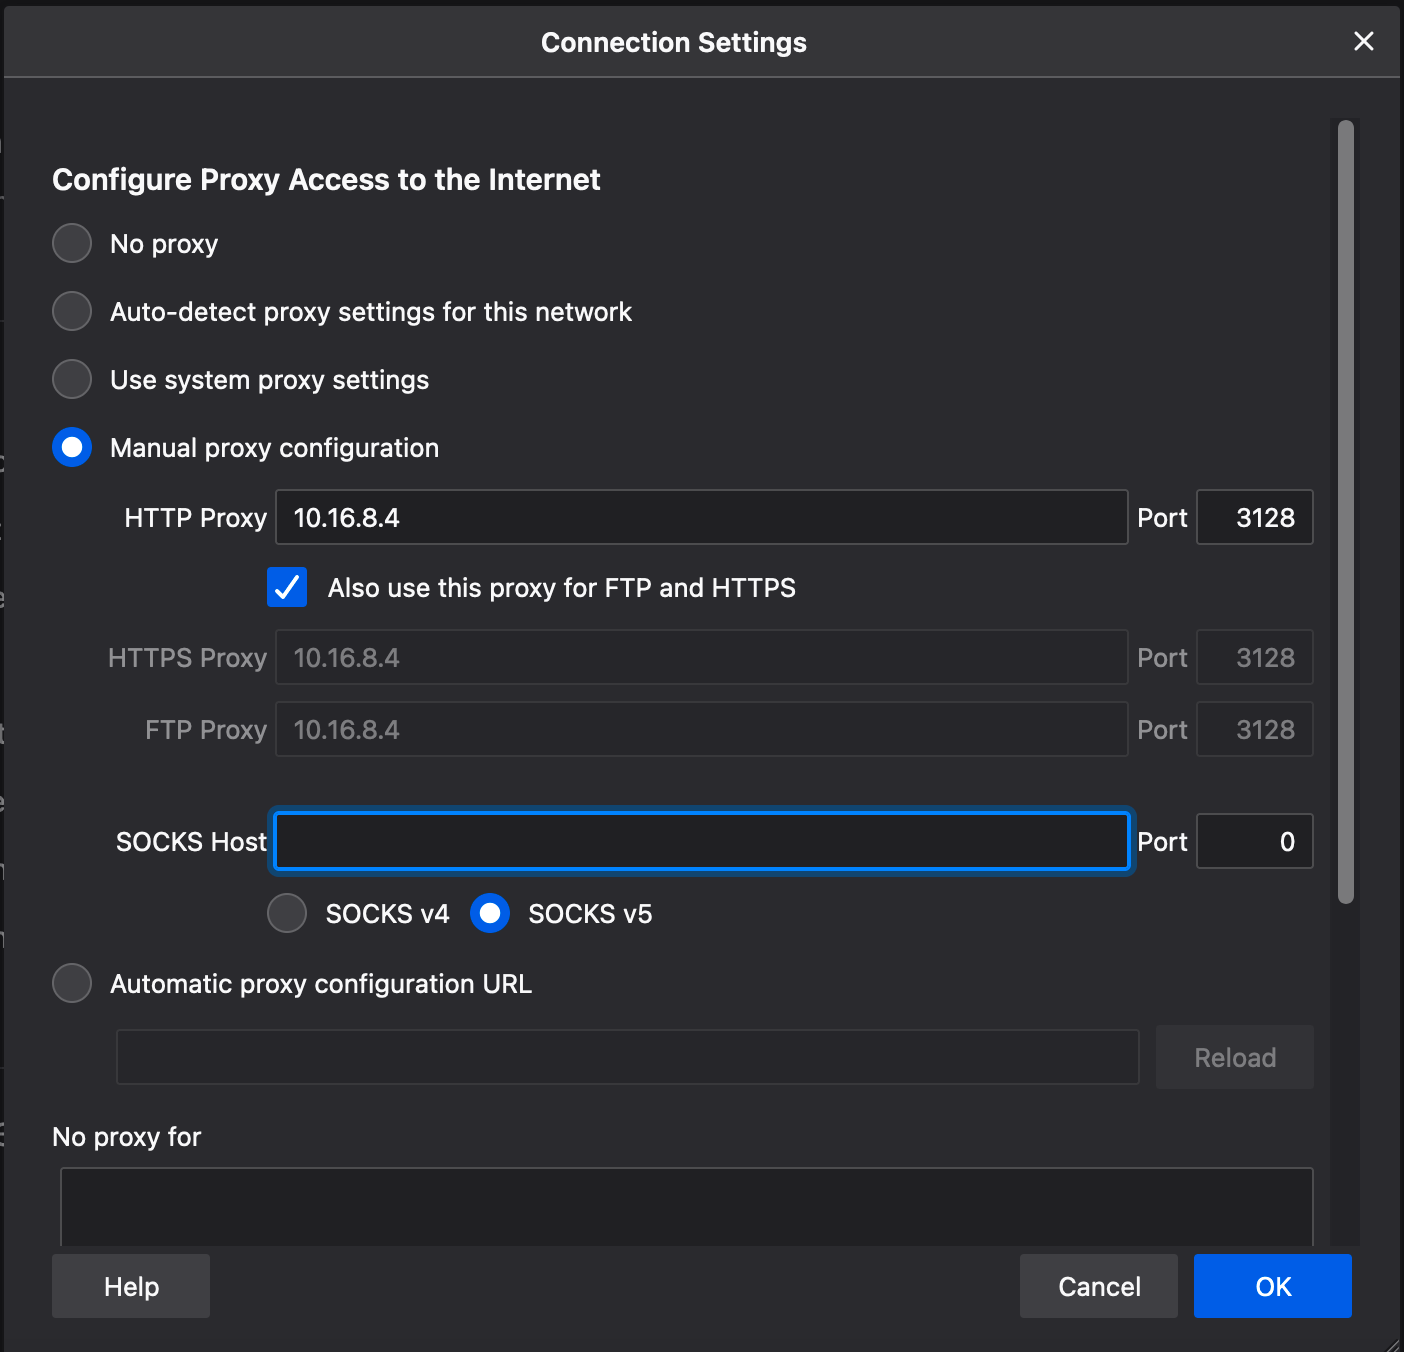
I also turned off my Mac’s WiFi to make sure that the traffic goes through the wired interface and uses the proxy. The test was successful and now I have the top layer of the hierarchy of IoT Edge network configured.
In the next post, I will go over configuring the L5 of the Purdue network architecture and installing Azure IoT Edge runtime on it.