
In my previous post What to Desire from a Good Image Annotator?, I wrote about the high-level capabilities of an Image Annotation Tool. In this one, I will go over the requirements for the actual image annotations or as you may also know it, tagging. I will use two images as examples. The first one is a scanned receipt. The receipt example can be used to generalize the broader category of scanned documents, whether financial, legal, or others. The second example is of a cityscape. That one can be used to generalize any other image.
Annotating Store Receipt
Let’s start with the receipt. A receipt is a scanned document that contains financial information. Below is just one way that you may want to annotate a receipt.
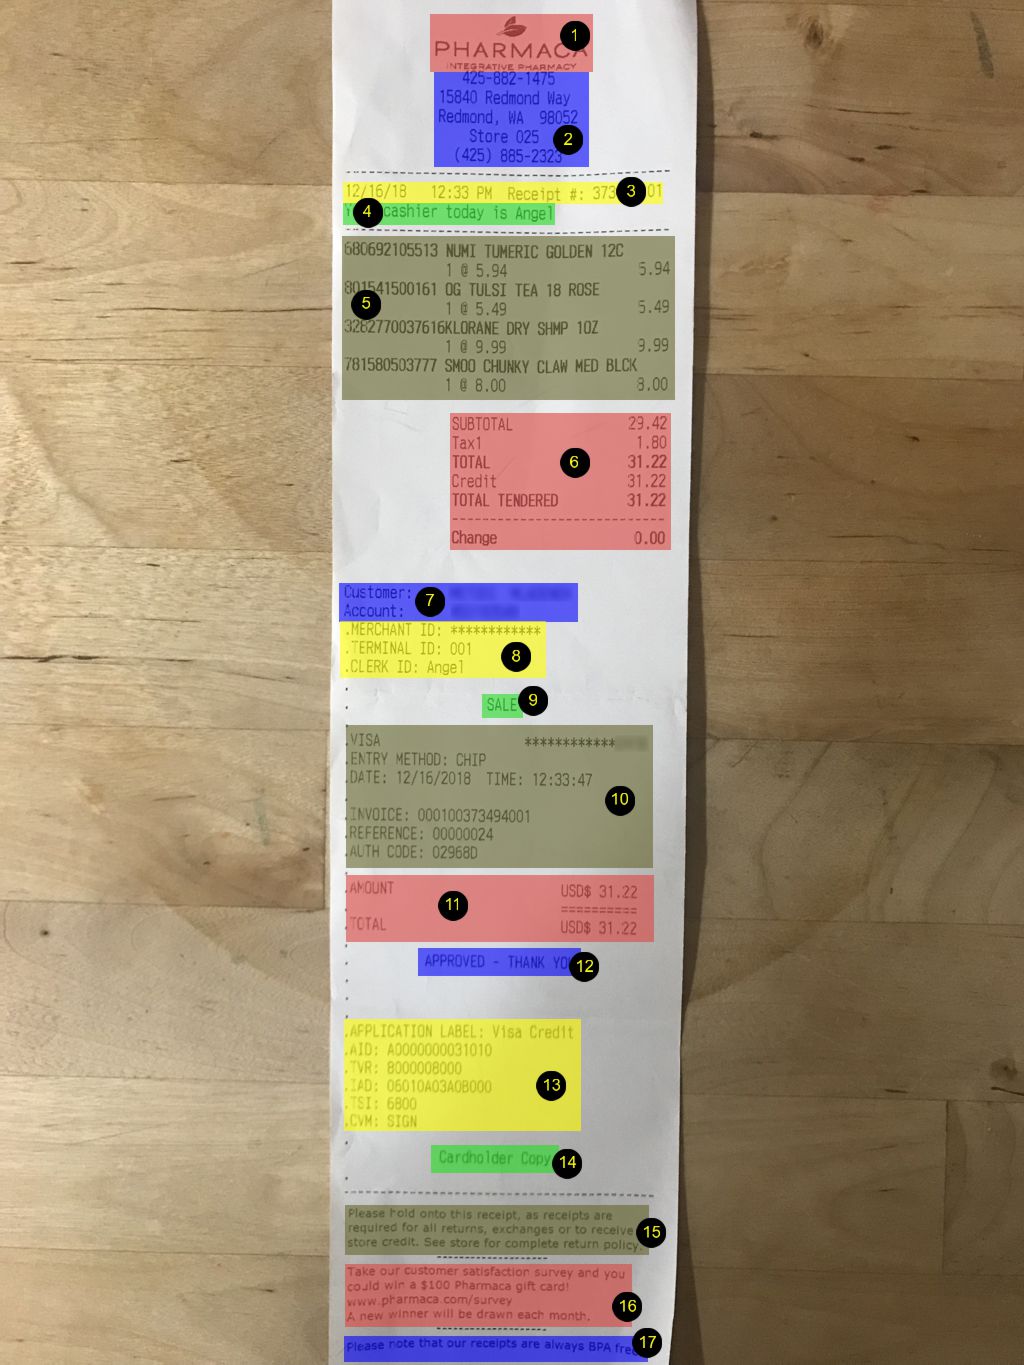
In this example, I have decided to annotate the receipt using the logical grouping of information printed on it. Each region is a rectangle that contains the part of the image that belongs together. Here is the list of regions and their possible annotations:
- Region ID: 1
Annotation: Store Logo
Description: This can be the store logo or just the name printed on the receipt - Region ID: 2
Annotation: Store Details
Description: This can include information like address, phone number, store number, etc. - Region ID: 3
Annotation: Receipt Metadata
Description: This can be the date and time, receipt number as well as another receipt specific metadata - Region ID: 4
Annotation: Cashier Details
Description: This is information about the cashier - Region ID: 5
Annotation: Items
Description: Those are the purchased items, the quantities and the individual item price - Region ID: 6
Annotation: Receipt Summary
Description: This is the summary of the information for the purchase like subtotal amount, tax and the total amount - Region ID: 7
Annotation: Customer Information
Description: This is information about the customer and any loyalty programs she or he participates to - Region ID: 8
Annotation: Merchant Details
Description: This is additional information about the merchant - Region ID: 9
Annotation: Transaction Type
Description: This is information about the transaction - Region ID: 10
Annotation: Transaction Details
Description: This contains information about the transaction with the payment card processor. It can include transaction ID, the card type and number, timestamp, authorization code, etc. - Region ID: 11
Annotation: Transaction Amounts
Description: This summarizes the amounts for the transaction with the payment card processor - Region ID: 12
Annotation: Transaction Status
Description: This is the status of the transaction – i.e., Approved or Declined - Region ID: 13
Annotation: Transaction Info
Description: Those are technical details about the transaction - Region ID: 14
Annotation: Copy Owner
Description: This is information about the ownership of the receipt. Usually, this is Merchant or Customer - Region ID: 15, 16, and 17
Annotation: Additional Details
Description: Those can be various things like return policies, disclaimers, advertisement, surveys, notes, and so on. In this example, we have 15 as Return Policy, 16 as Survey and 17 as Additional Notes
When you think about it, the above areas will be the ones that your eyesd will immediately look to find information. For example, if you want to know what store the receipt was from, you will directly look at the top where the logo should be (Region #1); if you want to know what the total amount is, your eyes will steer towards the receipt summary (Region #6) and so on. Majority of us will follow a similar approach for separating the data because it is something that we do every day in our minds.
Few things to note about the annotations above. First, not every receipt will have all the information from above. Some receipts will have more and some less. Second, annotations evolve. After annotating a certain number of receipts, you start building a pattern and make fewer changes the more you annotate. However, after some time, you may discover that the patterns you developed need to be updated. A straightforward example is a better name for the annotation. If this happens, you need to go back and change the names. Third, there is no standard way to name those annotations. You and I will undoubtedly have different names for the same thing.
Now, let’s write a few requirements from this receipt example.
- The first thing we did is to draw the rectangular regions that we want to annotate. And this is our first and simplest requirement.
- The second thing we did is to annotate the rectangular region. When we create the annotation, we should be able to add additional information like description of the annotation
- The third thing we want is to be able to update annotation information retrospectively.
Those are good as a beginning. But to provide more context and backup our requirements, it will be useful to think about how those annotations will be used, i.e., define our use cases. I kind of hinted to those above.
Use Case #1: Logo Recognition
Let’s say; you are developing classification application that is used to recognize the store the receipt if from. You can easily do this by looking at the store logo only and develop a machine learning algorithm that returns the name of the store by recognizing the logo. For this, the only region you will need is Region 1 with the logo. Thus, you can just cut this region from the receipt and teach your algorithm only on the logo. That way you minimize the noise from the rest of the receipt and your algorithm can have better accuracy.
Use Case #2: Receipt Amount Extraction
If your application needs to extract the summary amounts from the receipt, you can concentrate on Region 6. That region contains all the information you will need. Few things you can do with this region are:
- Binarize the area
- Straighten the text
- OCR the text
- Analyze the extracted text (not an image related task anymore:))
This use case is applicable for any other are you annotated on the receipt. It doesn’t matter whether you want to obtain the credit card number or the timestamp; the approach will be the same.
Nested Annotations
Now, let’s look at another way to annotate the same receipt.

If your application needs to determine what are your shopping habbits based on geography, you will need to extract detailed information about the store location. Thus, you will want to annotate the receipt as above to know which part is the street address, which is the city, etc. But those regions are all nested in Region 2 from our first annotation pass. It will be useful to have both types of annotations and use them for different use cases.
So, the requirements for the tool will be:
- Users should be able to create nested regions for annotations. Or we can write this requirement more generically as
- Users should be able to make annotations dependable
That is also very relevant in the next example, where we have areas with buildings but also want to annotate a single building.
Annotating Cityscapes
Annotating landscapes, cityscapes or other images with real objects is very similar to the receipt annotation. However, real objects rarely have regular shapes in pictures. Here is an example from a picture I took in Tokyo some time ago.
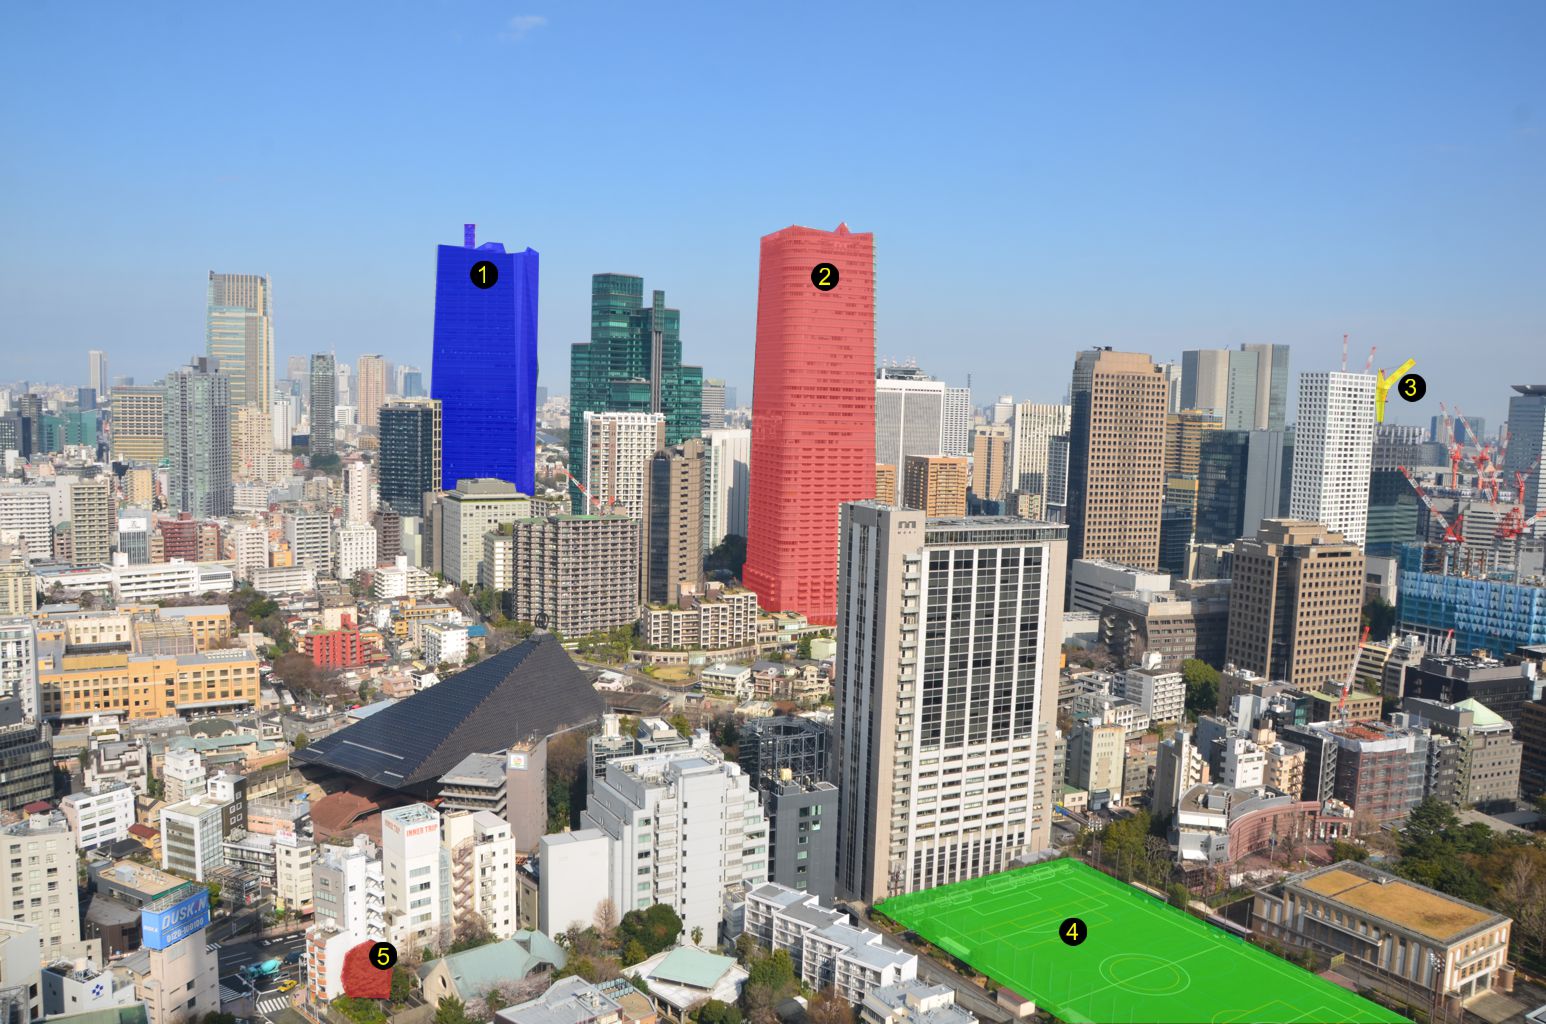
In this example, I have annotated only a few of the objects: two buildings (1 and 2), a crane (3), soccer field (4) and a tree (5). The requirements for annotating landscapes are not too different from the requirements for annotating documents. There is just one more thing we need to add to the tool to support real object tagging:
- We should be able to create free-form regions for annotations
There are many use cases that you can develop for real-object recognition, and for that, versatile annotation capabilities will be important in any tool.
Additional Requirements for Annotations
All requirements that I have listed above are specific to the objects or areas in the pictures. However, we need to have the ability to add meta information to the whole picture. Well, you may think we already have a way to do that! We can use the EXIF data. The EXIF data is helpful, and it is automatically populated by the camera or the editing tool. However, it has limited capabilities for free-form meta-information because its fields are standardized.
For example, if you want to capture information who annotated the image last and at what time, you cannot use the EXIF fields for that. You can repurpose some EXIF fields, but you will lose the the original information. What we need is a simple way to create key-value metadata for the image. Of course, having the ability to see the EXIF information would be a helpful feature, although maybe not a high priority one.
With all that, I believe we have enough requirements to start working on tool design. If you are curious to follow the development or participate in it, you can head over to the Image Annotator Github project. The next thing we need to do is to do some design work. That includes UI design, back-end design, and data model.
Leave a Reply